

Fried Liver Attack: The Complete Guide

Fried Liver Attack is one of the oldest and at the same time most popular opening lines at the beginner level. You can see it played even by grandmasters sometimes but usually experienced players tend to avoid it as Black. Of course, it is not only because the Fried Liver Attack sounds scary (friendly internet users assure us it comes from an Italian saying “dead as a piece of the liver”) but the attack is very dangerous for Black objectively.
It starts after common developing moves 1.e4 e5 2.Nf3 Nc6 3.Bc4,
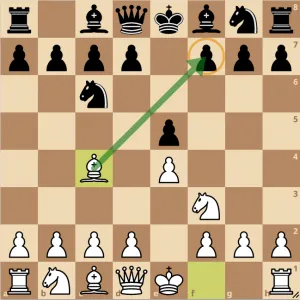
when White develops the kingside minor pieces most dangerously: the bishop is targeting the f7 square – the weakest point in Black’s position. Black now has two popular options: 3…Bc5 (The Italian Game) and 3…Nf6 (The Two Knights Defense). The second option allows White to be very aggressive and go 4.Ng5.
This attacks f7 and causes a headache to the second player. How to defend f7?
Note that it became possible because the knight on f6 just blocked the way for the queen from d8 to g5. After 3…Bc5 (The Italian Game), this knight jump wouldn’t be possible.
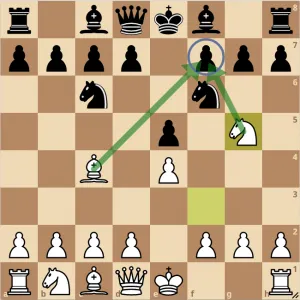
Looks like there is only one way to stop the threats: to go 4…d5. Moves like 4…Qe7 or 4…Rg8 allow White to take on f7 for free and don’t help anyhow but you still can see them played by beginners.
Note, there are also tricky moves 4…Bc5 and even 4…Nxe4, but you will see them played only by dodgy advanced players.
Now White takes on d5, after which Black’s most natural reply to take back with the knight allows the Fried Liver Attack. 5.exd5 Nxd5
Fried Liver Attack – Part 1
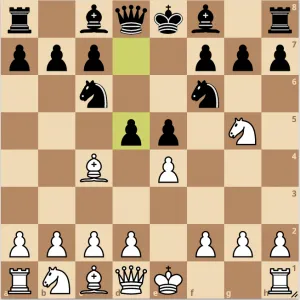
In this position, White can sacrifice the knight on f7. This move starts the Fried Liver Attack and invites Black’s king for a walk to the center of the board (which is full of different kinds of danger). The idea is that after 6.Nxf7 Kxf7, White has a great move 7.Qf3+ at their disposal.
Let’s also mention that White had another great move 6.d4, which would start the so-called Lolli Attack. This move was used by Robert James Fischer and many other strong players. It leads to difficult positions for Black as well but does not look as spectacular as the Fried Liver Attack.
The king and the knight are under attack at the same time, so the only way to deal with both threats at once is to go 7…Ke6. This is what White wanted to achieve: the enemy king is now too far from the home; White’s pieces can’t wait to checkmate him!
The first time the Fried Liver Attack was played was back in 1610, in the game Polerio – D’Arminio. Here is that game. You can see how quickly White destroyed their opponent.
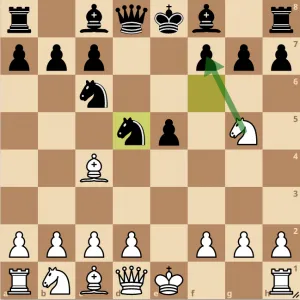
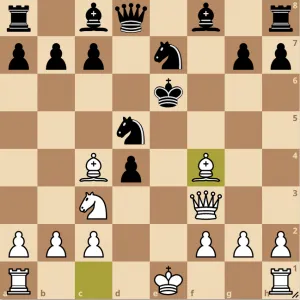
Let’s get back to the position after 7…Ke6. Now White can attack Black’s knight with 8.Nc3, after which Black usually protects it with the other knight 8…Nb4.

Now White castles short (9.0-0), hiding their king in a safe place and bringing the rook into the game; Black bolsters their knight with the pawn 9…c6. All those logical moves lead to this unusual position.

Part 2
Let’s briefly evaluate it. White has better development, and Black’s king is exposed but they are a piece up. Now White has to play energetically and try to open the position as quickly as possible. Only 10.d4! is good enough here. In other cases, Black’s king would escape, and White would be missing the sacrificed knight a lot.
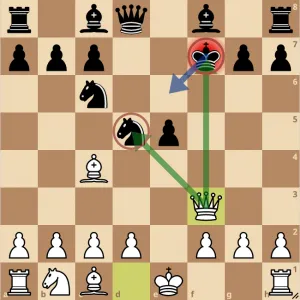
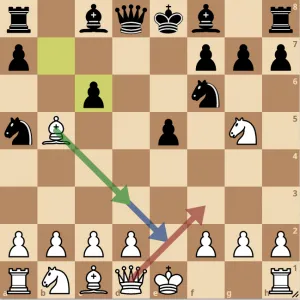
If Black acts greedily and takes the pawn on c2 (which is the most popular move in the position, according to my database!), White gets a winning attack after 10…Nxc2 11.dxe5! For the first time, this was seen back in 1932, when Eugene Znosko-Borovsky sacrificed the rook on a1 to open the d-file as fast as possible. You can see how the game was finished in the PGN-viewer below.
It is better for Black to go 10…Qf6, offering a queen exchange. That’s the right strategy – the defensive side should try reducing the enemy attacking potential. White, being material down and hoping for a mating attack, should, of course, keep the queens on the board: 11.Qe2!
White’s pieces are ready to enter the game quickly and Black is in huge trouble. I think we can stop here and see how we could punish Black’s options on the previous moves.
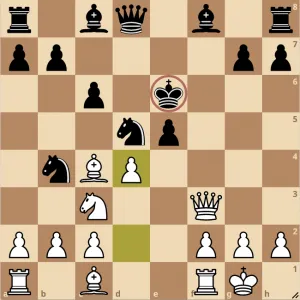
On move 8, you can expect some of your opponents to play 8…Ne7 instead of 8…Nb4.
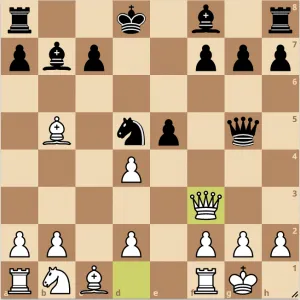
Here Black is not threatening to take on c2 with a check, so we can open up the position with 9.d4! immediately. If Black greedily takes on d4 with 9…exd4, there is a very beautiful winning variation for White:
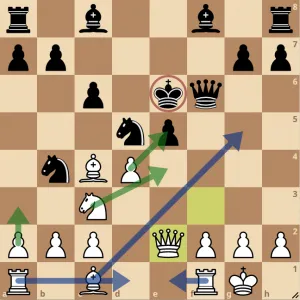
10.Bf4!!
This gorgeous move cuts all the ways back for Black and prepares castling long side. After 10…dxc3 11.0-0-0! cxb2+ 12.Kb1.

Fried Liver Attack – Part 3
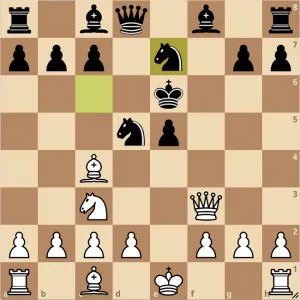
Black’s extra material will not help them survive anyhow. White’s last inactive piece is about to get into the game and give a deadly check from e1, after which Black’s position will fall apart. This was quite a nice line that illustrated basic attacking principles well. White played energetically and opened the position in no time. Two knights and two pawns were sacrificed along the way; all the pieces were developed to the most active places possible.
There are many similar furious lines in this variation, which once again shows why it was called the Fried Liver Attack.
Now let’s look at a modern example. A few years ago the legendary attacking player Alexei Shirov got a chance to play the Fried Liver Attack against a Lithuanian grandmaster Sarunas Sulskis. The game was played in the 2014 Olympiad in Tromsoe; both players were representing their countries and had to show their best. Look what an exciting game they played!
To get a full picture of the variation, let’s see where Black could do better to avoid the Fried Liver Attack.

Recall this moment? Hard to believe but the best Black can do here is to go 5…Na5. This move attacks the c4-bishop and forces it to leave the dangerous position. After 6.Bb5+ c6 7.dxc6 bxc6, the following position appears:
Part 4
White has three popular options here: 8.Be2, 8.Bd3, and 8.Qf3, pinning the c6-pawn. All the moves lead to complicated positions, where White has an extra pawn but in exchange Black enjoys some lead in development and open files and diagonals for their pieces. These positions are complicated and interesting to play; you can see games started like this at the highest possible level: recently Wesley So and Magnus Carlsen had this variation on the board in an important match.
Apart from 5…Na5 there is also a crazy move 5…b5.

Now the best White can do is to go with the bishop all the way back 6.Bf1. The point is that after 6.Bxb5, Black has 6…Qxd5; and after 6.dxc6 bxc4 the position is about equal as well.
The long forced variation 6.Bf1 Nd4 7.c3 Nxd5 8.cxd4 Qxg5 9.Bxb5+ Kd8 10.0-0 Bb7 11.Qf3! leads to White’s advantage.
Conclusion
In this article, we explained different subtleties of the Fried Liver Attack. It is one of the most dangerous opening variations in chess, and practical results show that Black should avoid falling into it. The main thing to remember as White is to play energetically; otherwise, you are risking losing the game because of the lack of material. The variation is full of different tactical ideas and teaches you to hold the initiative and attack the king in the center. These are very important skills for any chess player to master.
Also, make sure to take a look at Black’s alternatives; experienced players will try something different for sure: the Fried Liver Attack is too dangerous in a practical game.


Comments: