

Provoking Weaknesses in the Opponent’s Position

Weakness is probably the most important part of the chess game. Most of the ideas that can surface in a position are usually based on some kind of weakness. Whether it is a pawn, a square or a whole bunch of squares, weaknesses are something we try our best to provoke in our opponent’s position and then exploit at the maximum. Although most players will frame this concept under positional play, that is not always the case. Even when preparing an attack, it is important to first provoke weakness in the castle and create a rupture point and then get to the action.
Pawn moves always leave weaknesses behind and we should think twice before unnecessarily pushing one forward. It may look like nothing immediate will happen to us, but in reality, we might have created a long-term weakness that our opponent will be happy to use if allowed.
Something similar happened in the recent game between Carrisa Yip and Kateryna Lagno played in the Cairns Cup in Saint Louis. In an equal position, the Russian player went for the normal-looking 18…Rab8, attacking the pawn on b2:
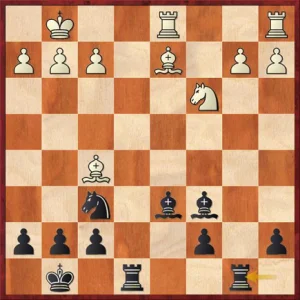
Now white has to make a choice between 19. Rab1 or 19. b3. Her young opponent almost immediately went for the latter, not noticing the dangers that could lie in the resulting position. This move is far from being the losing mistake, but it does weaken the position unnecessarily. In the diagrammed position white has a perfect structure. There are no weaknesses that black could use to create pressure.
Her more experienced opponent understood this and, with her last move, is trying to provoke a pawn advance in order to get something to play for. After the game moves the dark squares are suddenly weak and black could at some point use this by means of Ba3, Bb4 or even Be5.
After achieving what she was hoping for, Kateryna went on to improve her now no-longer-useful-on-the-b-file rook by playing 19…Rbd8. Suddenly, the position is not so easy to play for white and the threat is now …Bb4.
The game continued with 20.Be1 – g6 21.Bc2-a5 22.Rd3 and now: 22…Nh5! Intending to improve her knight to f4:
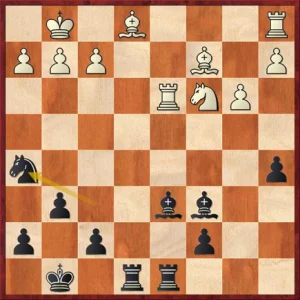
This is, of course, something that white wouldn’t like to allow, but the right way to parry this threat is no longer as easy to spot. Again, it was important for white not to create any additional weaknesses in her position, since black’s pieces are active and well-coordinated, while white’s are still struggling to find a good set-up.
The correct move in this position was awkward-looking 23.Bd2! avoiding weakening at any cost. Instead, the game continued with 23.g3, when the bishop on c6 becomes a monster. Again, black is happy with what her last move has achieved and proceeds to bring the knight back home: 23…Nf6! New weaknesses have been created, so the pieces must be arranged accordingly. The knight is now headed to g4, from where it not only hits on f2 but can also be rerouted to f3 via e5.
It is incredible to see how much black has achieved from our first diagram only through-provoking weaknesses in her opponent’s camp. The game continued with 24.Rad1 – Ng4, threatening the deadly …Ne5. White went 25.Nd5, trying to block the nasty bishop on c6, but now she loses control over the entry square on e2:
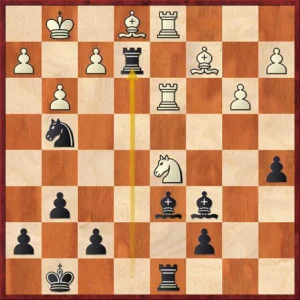
Black responded with 25…Re2 and her pressure are now more than obvious. White is still not entirely lost, but the defense is extremely difficult and her position soon crumbled into pieces. Amazing positional play from Kateryna Lagno!


Comments: