

Typical Pawn Breaks: Ruining the Opponent’s Pawn Structure


We often stress how important it is to pay great attention to pawn moves, as they usually leave behind unpleasant weaknesses.
These are small pluses that can be developed during the game – they give something to play against and develop a plan around. In positions where there are no important weaknesses in the opponent’s camp one common idea is to provoke them by creating threats that can only be parried with a pawn advance. Even if this may not look like a big achievement at first, slow play can be developed around them.
In addition to this, another idea that you will often see in Grandmasters’ games is that of ruining the opponent’s pawn structure, even at the cost of one pawn. In general, the compensation is based on long-term pressure against the weakened pawns and play for the initiative.
In the following example black executes a typical rupture that is meant to create targets of attack in white’s position:
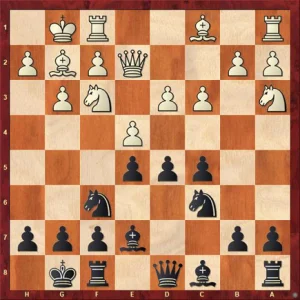
Magem, J – Lagarde, M, Catalan League 2020
Black to play
In many similar structures, black’s idea is to challenge white’s center with a timely c5-c4 advance. In this case, thanks to the pressure on the e4 pawn, this pawn break is even more tempting. Furthermore, after the e7 bishop’s diagonal is open, black could continue with Bxa3 when white will be left with two ugly doubled pawns – on the c and files.
The game continued with 9…c4 10.dxc4 – dxe4 11.Nd2 – Bxa3 12.bxa3 – Bg4, developing the light-squared bishop with tempo, 13.Qe3:
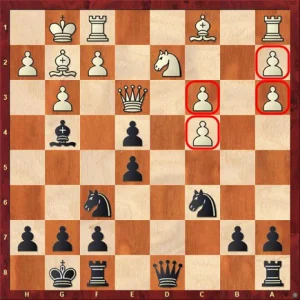
Position after 13.Qe3
White’s structure is compromised and black has many good ways to start putting pressure on his pawns. He could continue, for example with 13…Be6, immediately eyeing the c4 pawn, or 13…Rc8 or 13…Qc7 followed by ideas such as …Be6 or …Na5.
However, in the game, he chose to go for the immediate 13…Na5, which allows white to grab a pawn, but black gets good play and active pieces in exchange. White took on e4 – 14.Nxe4 – Nxc4 15.Nxf6 – Qxf6 and now 16.Qe4 attacks both the bishop on g4 and the pawn on b7. Black played 16…Qe6 and now 17.Qxb7 – Rad8 18.Qxa7:
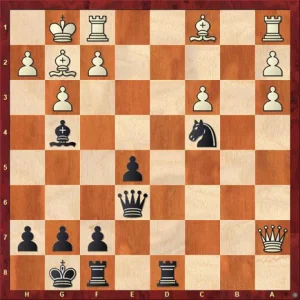
Position after 18.Qxa7
White has emerged with two pawns up, but black’s compensation is more than obvious – his pieces are active and coordinated, while white’s weak queenside pawns will represent a long-term weakness. Not only this but with the white queen so far away from the action, a new idea suddenly looks very interesting for black – building an attack against the white king.
He continued here with 18…e4, when his plan is pretty simple – trade the main defender of the king, his light-squared bishop, and play for the weakness of the light squares around the castle.
After 19.Bf4 – Bf3 20.Rfe1 – Bxg2 21.Kxg2 we reach the following critical moment:
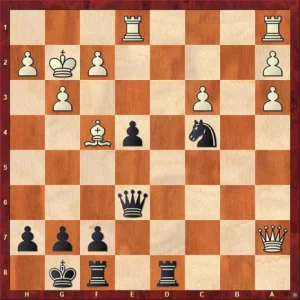
Position after 21.Kxg2
Black has achieved his first part of the plan but needs to act fast. If allowed, white will continue with Qb7, keeping an eye on the kingside and the light squares and perhaps Rad1, looking to provoke some trades; let’s not forget that he does have two extra pawns!
In other words, black cannot lose momentum, so he plays 21…e3! sacrificing the third pawn in order to be the first to occupy the long diagonal and get to use the weakness of the light squares.
After 22.Bxe3 – Qc6+ white’s position looks very uncomfortable, while black’s next following ideas are pretty clear. Ne5 followed by Nf3 is suddenly a big threat in case white goes 23.Kg1, while 23.f3, as played in the game, doesn’t look like a great option either. The white queen never got back in the game and black went on to win a few moves later.


Comments: