

Unexpected Pawn Breaks – d4-d5 in the IQP


Pawn breaks are powerful tools that can change completely the character of a position. Generally, they are known to be freeing moves that help improve our position and are meant to create problems in our opponent’s – weaknesses, dangerous open files, etc. In positions with the isolated queen’s pawn specifically, the typical break that we learn from the very beginning is the advance of the central pawn.
More than getting rid of a weak pawn, this move is meant to open our own pieces. Some of the pieces that come to life immediately are usually the light squared bishop and the two rooks that are normally placed on the d and e files. Besides this, the side who executes it also obtains an important central square (d4/d5) that can be used in the attack either for activating the knight or other pieces that need to join the action on the kingside /center.
While the idea of pushing d4-d5 /d5-d4 is widely known and most of the players always consider it when having the isolated pawn, there are positions where this idea is not so easy to spot. These are the positions that involve a certain sacrifice.
Most common is the idea of sacrificing the isolated pawn for initiative and piece activity, but it can get even better than this. In this article we are going to present and discuss some interesting positions where this typical pawn break may come as a surprise and it has a devastating effect on the opponent’s position.
Let’s start with the following diagram:

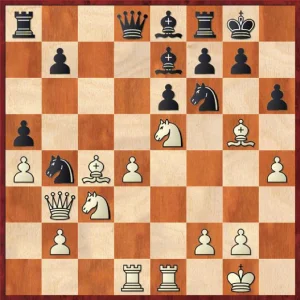
Nedilko, Vasily – Grekh, Andrey, Alushta 2009
Black has just played h7-h6, threatening to take the bishop on g5.
The automatic response would be to start searching for a suitable square for the bishop or assess the trade on f6 followed by the thematic d4-d5. However, thanks to his development advantage and piece superiority, white has a third, perhaps incredible option – to leave the bishop on g5! Indeed, here white can simply ignore black’s threat and play d4-d5 anyway.
A short calculation will reveal that the dark squared bishop is untouchable.
For example, if black continues with 14…hxg5, after 15. dxe6 – Qc7 16. exf7 +, white not only has the initiative and probably already enough compensation for the piece, but the bishop on e7 is also lost after 17. Nb5 – Qc5 18. Re5.
In the game black didn’t accept the sacrifice, but white’s position is clearly superior after that and he went on to win the game shortly after.
See how he played below:
The next position is quite similar:
Krylov, Mikhail – Reshetnikov, Alexey, Moscow, 2008
Black’s last move was – you’ve guessed it – h7-h6. We notice again that white’s pieces are placed on optimal squares, while black is still struggling with finishing his development. One important principle of the attack tells us that when there’s no more room for improvement in our position, we can start looking for tactical possibilities.
This makes d4-d5 a strong candidate again. In fact, here this advance works even better in the event of …hxg5 thanks to the bad position of the black’s light squared bishop and white’s pawn on h4.
See how white went on to win the game below:
Even though the two positions above are similar, it is important you know that this idea is possible and you can consider it even if your opponent has created a threat with his last move.
The characteristics of the position that make this unexpected move possible are almost always the same – better development and good piece coordination versus your opponent’s bad development/ piece coordination.
We hope you’ve enjoyed this idea and you’ll be able to successfully use it in your future games!


Comments: