

When to Place Your Queen on an UGLY Square?
One of the first things we learn about in chess is the value of the pieces. We start off with the points-value of the pieces and favorable combinations between them. Later on, we understand that this value is only relative and there is much more to chess than some simple rules.
We learn that when we talk about the value of a certain piece we have to take into consideration factors like the pawn structure, piece activity, coordination between pieces and so on.
We realize how important it is to keep our pieces active, bring them towards the center and give them targets of attack. It becomes clear now that even if of the same value, a piece on the rim is no longer equal to a centralized one.
The more we advance in chess, the more we understand that the “rules” we have learned and tried to apply since forever are more of a guideline and it all comes down to the actual position on the board in the end.
A piece in the center can sometimes become completely useless if it has no targets of attack and no army to help, while a piece that’s temporarily on the rim of the board can threaten to become extremely dangerous. In this article, we are going to talk about such apparently weird, but spectacular ideas that help improve our position by temporarily placing a piece – in our case the queen – on an unexpected ugly-looking square.
Let’s begin with the following position:
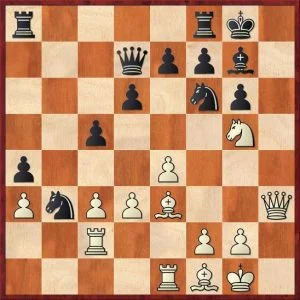
Polgar, J – Gelfand, B 2003
White to play
Black has just played 22…Qd7, forcing white to take a decision regarding the queen on h3. Black’s king is rather exposed here, so it makes sense for white to prefer to keep the queens on the board. At the same time, it looks like white’s attack has reached a dead end, as there aren’t any entry squares available and it’s not clear how she could bring more pieces into the attack either. However, Judit finds a move that does all of that.
She continued here with the spectacular 23. Qh1! As awkward as this square looks for a mighty queen, the idea behind it is pretty straightforward and powerful – white is preparing a rook lift to h2 after g3 and f4.
With more forces joining the attack, white’s prospects on the kingside look promising. Even though white didn’t win this game in the end, this idea is very powerful and yields a clear advantage in the diagrammed position.
You can play through the whole game below:
The following position appeared in a recent game of the Swiss Team Championship:
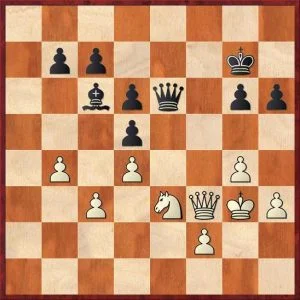
Pelletier, Y – Petrov, N, Switzerland, 2009
White to play
White’s position is clearly superior. The knight on e3 is completely dominating the bishop on c6, which is tied to the defense of the d5 pawn. For now, this is the only target of the knight, but it has good prospects on the kingside as well. The only thing white needs to do is weaken black’s structure for the queen and knight combo to come to life.
That being said, the idea of weakening the f5 square by advancing the h pawn becomes more and more attractive for white.
However, he need not hurry and allow black counterplay on the light squares; he has to support this rupture with – you’ve guessed it – his queen! Again, we see how playing an awkward move like Qh1 is actually an improvement of the position!
White continued with h4 – h5 and won the game shortly after.
Here is the full game:
We hope you’ve enjoyed the idea presented above and you will get the chance of using this spectacular maneuver in your future games.
Thank you for reading!


Comments: