We are happy to announce that GM Mihail Marin has completed one of his huge middlegame projects - Must-Know Structures for 1.d4 Players. The second and final part consists of 40 extensively annotated games which are divided into 5 sections. Besides, you get access to a Video Version with a running time of 3 hours. You will find also 71 test positions.
We are happy to announce that GM Mihail Marin has completed one of his huge middlegame projects – Must-Know Structures for 1.d4 Players.
The second and final part consists of 40 extensively annotated games which are divided into 5 sections. Besides, you get access to a Video Version with a running time of 3 hours. You will find also 71 test positions.
Preview by the Author:
Welcome to the second part of my work on typical structures after 1.d4! The structures examined in the first course were all connected by the fact that with the center under tension, they would imply that White plays cxd5 at some point.
In this course, we have two logical categories. The first one, consisting of the first three sections, also has as a starting point the central tension.
In section 3, we examine the structure arising after Black’s giving up the tension with dxc4, which is typical for such openings as the Queen’s Gambit, the Catalan, or the Gruenfeld. In the resulting structure, Black usually tries to break the center with either …c5 or …e5. In the former case, dxc5 reaches the structure with an open center, examined in section 1. In the latter, White gets a kingside majority, examined in section 2. It is better to start with 1 and 2 to have reference points when examining 3.
The second category of structures is related to the King’s Indian and similar openings. We have the structure resulting after …exd4 in section 4 and the blocked center in section 5.
As a general thought, the structures examined in sections 1, 3, and 5 are mainly static. However, there are many dynamic subtleties in the background. The structures corresponding to chapters 2 and 4 are dynamic, due to their non-symmetrical character. The player with a kingside majority would try to advance it. The side with a pawn on d6 would need to compensate dynamically for the relative lack of space.
A few words about the structure of each chapter. In the beginning, I have always examined games in which one of the sides got a crushing advantage, typical for the respective structure. We will then gradually lower the advantage level by introducing compensatory elements. Finally, we will also see how relative things can be, by examining games revealing the dark sides of the main plans, and if they need to prepare appropriately. The time has come to examine these structures one by one.
What you will learn:
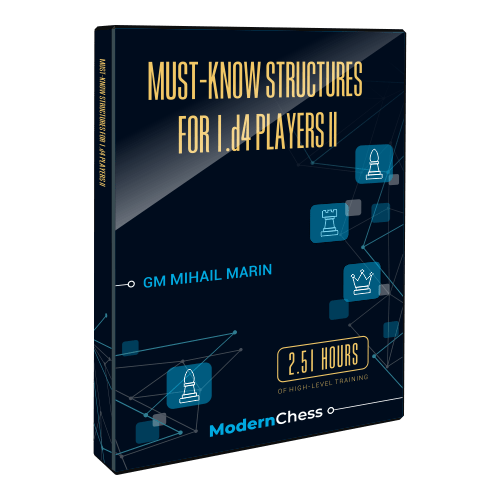
Open Centre
The structure with an open center (more specifically, open c- and d-files) arises in a wide range of openings when none of the players is interested in keeping an Isolani or hanging pawns. The play has a certain drawish tendency, as mass exchanges along the open files are hard to avoid, but everything depends on concrete details. With the board crowded with pieces, exchanges do not always take place automatically.
In the Catalan opening, for which the current position is typical, Black may face problems with completing his queenside development, typically resulting in long-term white pressure. The level of mobilization, or the quality of development, can also be a factor. The control over e5, d6, or c5 sometimes is a clue to the evaluation. For the active side, the plans based on a3 and b4 or e4-e5 may be effective tools, but one should not forget that the advance of the pawns also leaves undefended squares behind. As a final observation, the active side should plan its actions carefully since the slightest inaccuracy will likely turn the tables around. After all, the opponent has the same ideas available!
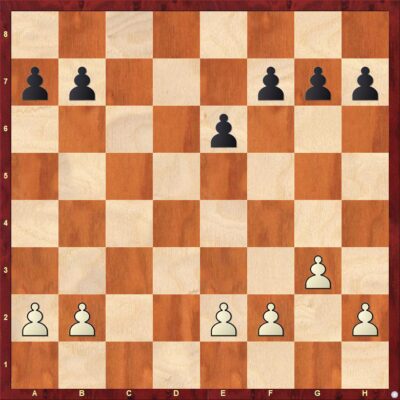
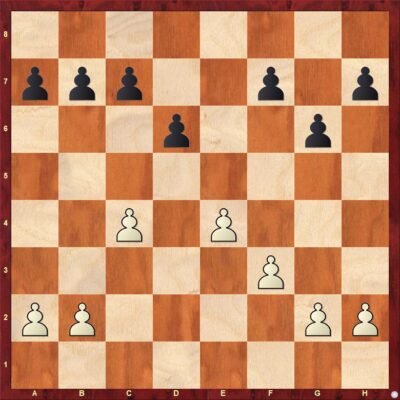
Kingside Majority
When putting on paper his ensemble of positional ideas, named by himself “The new school”, Wilhelm Steinitz made an important discovery regarding pawn majorities. In the endgame, a queenside majority was likely to yield an advantage, due to the possibility of creating an outside passed pawn.
In the middlegame, though, a kingside majority was preferable since it allows one to prepare a systematic kingside attack. We can be sure that players had an intuitive feeling about these ideas before Steinitz, but for a logical mind like that of the first official World champion, the structure was an important factor when evaluating a position and planning. Steinitz would agree that with both king’s castled long, his rule would be reversed, but this is just a formal observation. More importantly, things are always relative, since an advancing pawn majority tends to leave weaknesses behind. For a successful kingside attack, one needs to coordinate the action of the pieces and pawns, of course.
There are cases in which a player can get an attack without advancing his majority, or by starting to advance it only in the decisive phase. We can say that in such situations, the pawn majority plays its part in ensuring a higher safety for the own king. In the structure illustrated here, a bishop on b3 could exert annoying pressure on f7, while Black does not have the same idea. The pawn on e3 spares the white king any dangers. We will examine, as usual, both sides of the coin. We will see how a pawn attack can be successful and how the opponent can use the newly created weaknesses. The notion of “endgame” should not be confused with that of “queenless middlegame”. The queen’s exchange does not automatically make the queenside majority more threatening than that on the kingside.
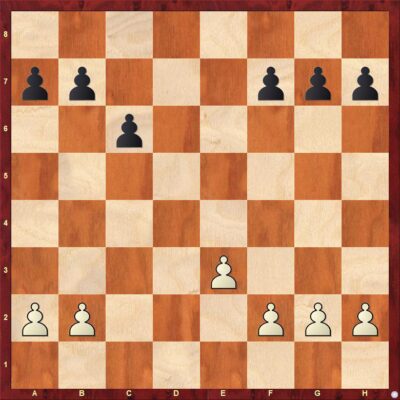
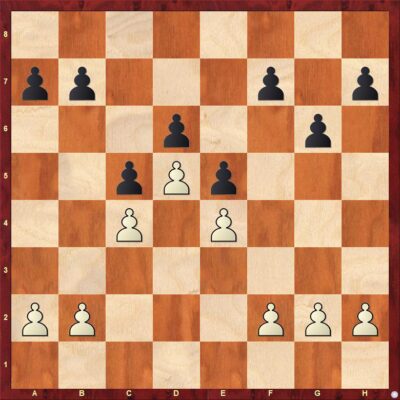
Black Releases the Tension with …dxc4
Most of the games examined in the previous two sections have passed through this structure. By carrying out …c5 or …e5 at an early stage, Black transposed to different structures, though. We will now deal with those cases when the structure does not suffer such early modifications. Maintaining this structure for a long time favors White, who has more space. Black usually tries to exchange minor pieces for solving his coordination problems. With all the minor pieces on board, his position would be very passive or even lost objectively. Increasing and converting White’s advantage is not always easy. For instance, he can jump with his knights on e5 and c5, but against the careful defense, this is only a partial success. The least committal plan is the queenside minority’s attack based on b4-b5. In most cases, this weakens Black’s queenside and is likely to result in a promising endgame. Unfortunately, this is only sometimes achievable. Another obvious idea is to occupy the center completely with e3-e4. This surely restricts Black’s pieces, but if not accompanied by a favorable break with d4-d5 (given the black pawn advances to c6), White is still due to come up with a concrete plan. With a stable center, the most promising idea is advancing the g-pawn to g5. This would offer attacking chances and force Black to weaken his control over d5 by retreating with the king. This would make the main break more effective. All the plans above are designed for the dream situation in which Black cannot break into the center. In many cases, though, White must combine his active plans with prophylactic measures to prevent or at least inhibit…c5 and …e5. The moment in which Black manages to break the center anyway is critical. Space means advantage and White should look for a way of converting his initial space superiority into a different form of advantage. All these elements make the fight in this structure very interesting.
King’s Indian Defence – Black Plays …exd4
This structure may arise from different openings. Most typically, Black plays …exd4 in the King’s Indian, but the same can happen in other Indian defenses. Alternatively, an early d2-d4 in the English Opening would reach the same. In this section, we will examine only games in which Black does not play an early …c7-c6. Those structures are by far more complex and require more detailed examination. The definitory elements for this structure are the pawns on c4 and d6. White’s e-pawn could also be on e3, or in the fianchetto systems, on e2. The most apparent plan for White is to occupy the d5-square with his queen’s knight. This is likely to yield him stable domination. In the event of …Bxd5 or …Nxd5, White’s most promising re-capture is cxd5, maintaining the kingside advantage and opening the c-file. This would also lead Black with a backward pawn on c7. So far, things sound sad for Black. You may ask “Why would Black go for this structure at all?” As usual, things are not one-sided. In many of the games below, Black releases the tension with the white knight on g1 and the bishop on g1. This means that White would need to expose his queen with …Qxd4. This is likely to cause a slight delay in development after …Nc6. Moreover, White’s kingside development is uneasy with the structure illustrated here. The knight would have to go to e2, temporarily leaving the bishop on f1 passive. If White starts with Bd3, the bishop will be exposed. All these elements offer Black dynamic chances. Sometimes, this is enough for equalizing, some other, it yields him a decisive attack. We can name the conflict “statics versus dynamics” or “space versus piece activity”.
Blocked Centre
The positions with a blocked center are the most complex in the course. Not by chance, this section contains the highest number of games. With nothing happening in the center, both sides should be concerned about their actions on the wings. Traditionally, Black should start a kingside attack based on …f7-f5, while White will aim at opening the b-file with b2-b4 (possibly prepared with a2-a3). In such cases, speed is an essential factor, of course. Things can also go differently. If well regrouped with a knight on d3 and possibly with g2-g3 on the board, White could think of breaking with f2-f4. Black could also be preparing…b7-b5, especially if White castles are long. In the latter case, Black could even sacrifice a pawn with …al-a6 followed by …b7-b5 to open queenside files. Unlike in the lines with the black c-pawn on its initial square, Black does not have the c5-square for his knight. This will likely cause certain piece congestion, with at least two black minor pieces competing for the square on d7. It also explains why the positions with this structure tend to favor White. Engines like White’s position a lot, too. The former evaluation is objective, but abstract. In practice, things are rather complicated. In order to break the black fortress, White needs to choose the right moment to open the position, which is an important commitment, often offering Black counter chances. The latter may be exaggerated many times since engines enjoy the space advantage, but do not always suggest constructive plans in such static positions. None of the players should think that the central structure is set once and forever. Positional piece sacrifices are possible on either e5 or c5. For Black, taking on d5 is a less probable plan, since the pawn is too safely defended. Black’s dark-squared bishop faces the danger of being “bad” in the endgame but can be useful in the middlegame, especially of the long diagonal opens after f2-f4, …exf4, or …f7-f5, exf5. White’s light-squared bishop is seldom bad. Even though the central pawns restrict it, White’s space advantage ensures the bishop enough maneuvering space. Moreover, after the exchange …Bg4xNf3, aimed at solving Black’s coordination problems, the white king’s bishop could become a blade, cutting along the h3-c8 diagonal.
Outline:
Chapter 1. Introduction
Chapter 2. Open Centre
Chapter 3. Kingside Majority
Chapter 4. Black Releases Tension in the Centre (dxc4)
Chapter 5. KID – Black Plays exd4
Chapter 6. Blocked Centre
About the Author:
GM Mihail Marin [FIDE 2463]
is a Romanian chess Grandmaster and a very popular chess coach and author. Marin’s first major success in international chess was qualifying for the Interzonal in 1987.
He has won the Romanian Championships on three occasions and has played in the Chess Olympiads ten times, winning a bronze individual medal in 1988. For several years he was the editor of the magazine Chess Extra press.
GM Mihail Marin is one of the most respected coaches in the world today having trained the young Judit Polgar and being praised for his ability to explain deep chess truths in a way improving players can understand.