We are happy to present the newest database of IM Renato Quintiliano - Semi-Slav - Complete Repertoire for Black - Part 2. The current database completes the survey of the Semi-Slav which was initiated by the previous database. The course consists of 11 theoretical chapters and Video Version (4.5h Running Time).
We are happy to present the newest database of IM Renato Quintiliano – Semi-Slav – Complete Repertoire for Black – Part 2. The current database completes the survey of the Semi-Slav which was initiated by the previous database. The course consists of 11 theoretical chapters and Video Version (4.5h Running Time).
Below, IM Quintiliano provides an overview of his course.
The starting position of the database arises after 1.d4 d5 2.c4 c6 3.Nc3 Nf6 4.e3 e6 5.Nf3 Nbd7 6.Qc2.
In this database, we will make a complete study of this move, which is called “Anti-Meran”, although as we will see, the Meran ideas are always there. On the other hand, this move order offers some flexibility for White’s plans and avoids the classical Meran lines (seen in the first database), which have been deeply analyzed and can be more forcing.
Here, we play 6…Bd6.
Of course, it doesn’t make sense to take on c4 if White doesn’t waste a tempo with the bishop, so we make a developing move while waiting for it. After 6…Bd6, White’s main move is by far 7.Bd3.
As usual, I start with the sidelines to help attain a better understanding of the opening. In Chapter 1 we check some of these lines, of which 7.e4!? seems the most interesting option. However, Black has a nice idea to face this variation, which can solve the opening problems very easily and even allow us to play for more.
Less principled but useful moves like 7.Bd2, 7.a3, and 7.h3 are also analyzed in Chapter 1. In these cases, Black is usually able to get an improved version of more popular lines, in which White’s 7th is not so useful and allows us to equalize without problems. In other cases, White tries to mix ideas and go for something strategically risky, when things tend to backfire, as the Semi-Slav is also positionally very sound.
In Chapter 2 we see the famous Shirov-Shabalov attack: 7.g4!?

A brilliant opening idea that was very popular some years ago, but now the theory has developed in a way that Black has even more than one option to solve his opening problems. Still, it’s very important not to be caught off guard by such an aggressive approach, so I offer a solid option to keep Black safe.
The line with 7.b3 is a popular and solid option for White, which is studied in Chapters 3, 4, and 5. White avoids the sharp lines by being ready to recapture on c4 with a pawn and aims to develop harmoniously, eventually going for the typical advance e3-e4 to gain more space in the center. In Chapter 3 I look at many different setups and move orders and try to explain the differences between them. Still, our attention is on the most popular position of this line, which arises after 7…0-0 8.Be2 (8.Bb2!? is a tricky move order. With this move, White aims to either get a better version of the lines seen in Chapters 3 and 4 by developing the light-squared bishop more actively to d3 or provoke an aggressive reaction by Black in the center. I initially thought this line would be a small headache, but then found a surprisingly simple and good solution played by Kramnik (Chapter 5).) 8…Qe7 9.0-0 b6 10.Bb2 Bb7 11.Rad1 Rad8 12.Rfe1 Rfe8 13.Bf1
Here White is fully centralized and looks ready for e3-e4. Black needs to fight for the center, and there are two equally interesting options to do that: 13…c5 is the more positional way, keeping some tension in the center and many possible changes in the structure. This usually leads to a positional battle that holds plenty of chances for both sides. We’ve already seen this structure in the first database (Chapter 5), so there are many similar ideas. I try to explain them in Chapter 3. 13…e5 is a more forceful line, but quite playable as well. The lines are not so difficult to remember and in general Black is doing well here, so I think it is useful to give you this extra option against 7.b3. The details are seen in Chapter 4.
The move 7.Be2!? is an interesting move order, and I also explain it briefly in Chapter 7. Although this usually transposes after Black’s eventual dxc4, some practical differences are good to know.
After 7.Bd3, the mainline follows with 7…0-0 8.0-0 dxc4!
I told you, Meran is always there! 8…e5!? is a very direct approach. This move usually allows Black to get comfortable play or leads to a balanced endgame, in which White has small pressure but usually can’t obtain a real advantage from it. I decided to offer this as a safe option against the main move order, especially because the lines are not complicated to remember and understand. This solid option is analyzed in Chapter 6.
The main crossroads arises after 9.Bxc4 b5
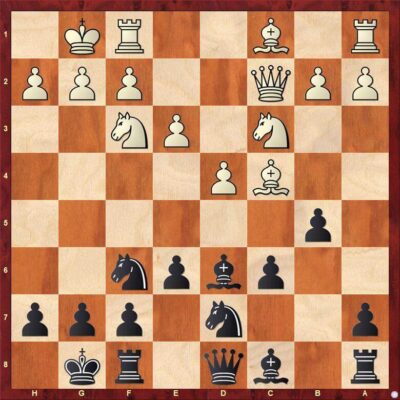
10.Be2 is the move that I consider to be White’s most promising option.
10.Bd3 used to be very popular, but it seems that theory is already well developed here, and Black has found the right path to equalize. This move is carefully analyzed in Chapters 7 and 8. The line 10…Bb7 11.a3 is the critical test for Black in this line.
White intends to play b2-b4, establishing firm control on the queenside, when Black’s position could become unpleasant. This line had a nice reputation until a brilliant idea found by Kasimdzhanov showed that Black can equalize almost by force. The theory of this line has developed a lot in the last 10 years, but I think it’s safe to say that Black is OK here. I decided to dedicate an entire chapter to this line (Chapter 8).
Instead of 11.a3, another natural line is 11.e4 e5 12.dxe5 Nxe5 13.Nxe5 Bxe5 14.h3
White aims to use the kingside majority to gain more space in the center and develops the dark-squared bishop to e3 to keep an eye on Black’s queenside. Still, with correct play, Black can prevent White’s plan and execute his own. In Chapter 7 I show the right path for Black here.
After 9.Bxc4 b5 10.Be2 Bb7, we have another important position.
I think that White’s best option is 11.e4.
In Chapter 9, we see 11.Rd1, which is the most played move. The most interesting position arises after 11…Qc7 12.e4 e5 13.dxe5 Nxe5 14.Nd4
Here Black has a choice between two good options, 14…Neg4 being the most ambitious one. This move leads to some sharp complications, but as we see in Chapter 9, nothing is really new in chess. In Chapter 9 I also cover many different move orders and sidelines for White. As usual, some of them don’t offer any problem for Black, while others have some potential and should not be underestimated. 14…Bc5 is the solid option and also equalizes.
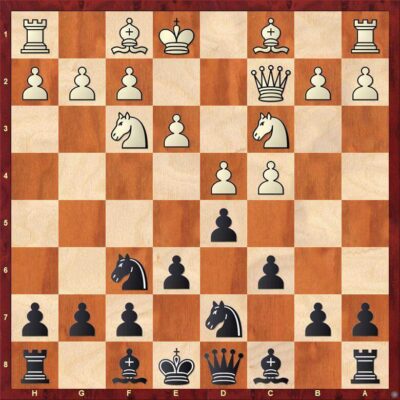
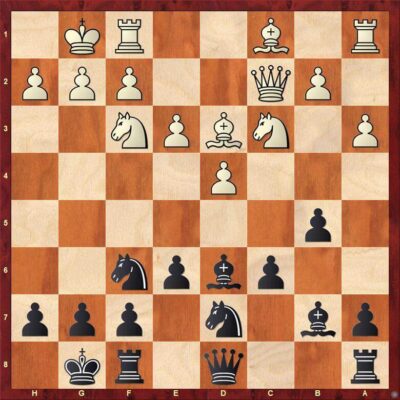
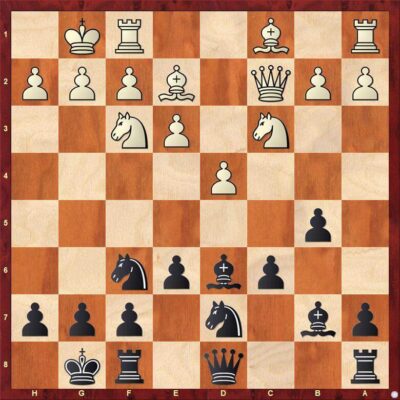
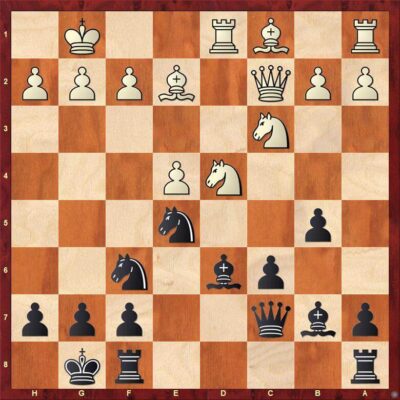
The most critical position arises after 11.e4 e5 12.dxe5 Nxe5
Here we have an important crossroads for White. 13.Nh4!? After analyzing both options I came to the conclusion that this is White’s best try. It’s a relatively fresh line which leads to very interesting and double-edged positions.
13.Nd4 is more popular, but the theory seems well developed here and Black is doing very well. The plan of looking for active counterplay with 13…Neg4! 14.g3 Bc5! gives Black at least equal chances, and especially after the game Nakamura-Giri in the 2016 Candidates, it became clear that Giri’s new move was good enough to solve Black’s problems. All sidelines and important ideas of this line are seen in Chapter 10.
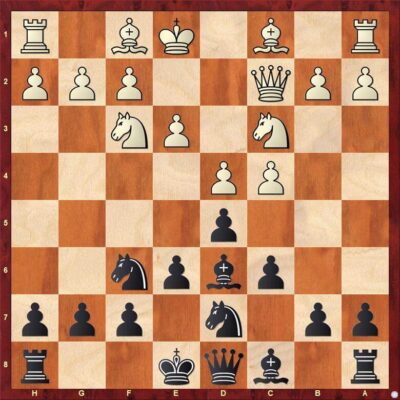
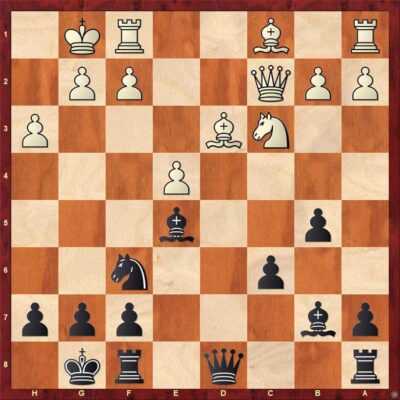
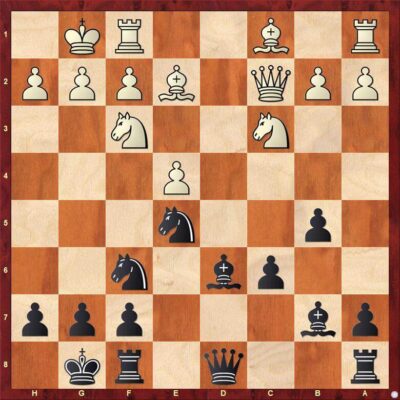
After 13.Nh4!? g6 14.f4 Neg4, White can choose between two interesting positions.

My main line follows with 15.g3.
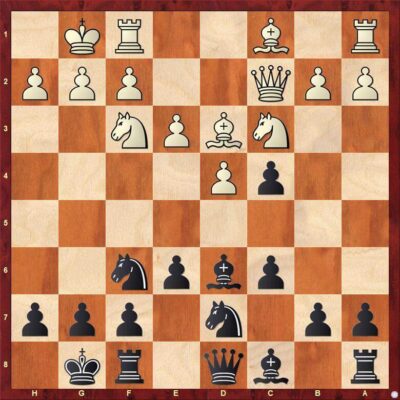
The alternative 15.e5!? by force leads to an unbalanced position after 15…Bc5 16.Kh1 Nf2 17.Rxf2 Bxf2 18.Nf3 Nd5 19.f5, when White has sacrificed an exchange for promising chances of an attack against the Black king. It’s very hard to know who is playing for an advantage here. The position seems dynamically balanced, which means that both sides need to be accurate to keep control. This line has been seen only in a few games and I try to investigate some ideas for both sides in Chapter 11.
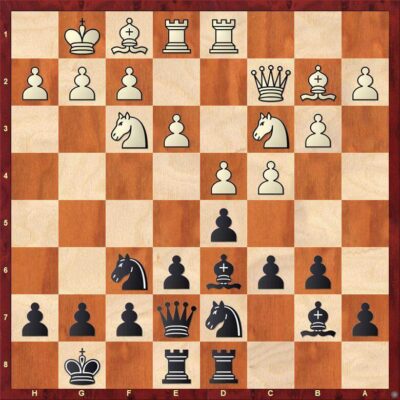
After 15.g3 Bc5+ 16.Kh1 b4!? 17.Nd1 Bd4
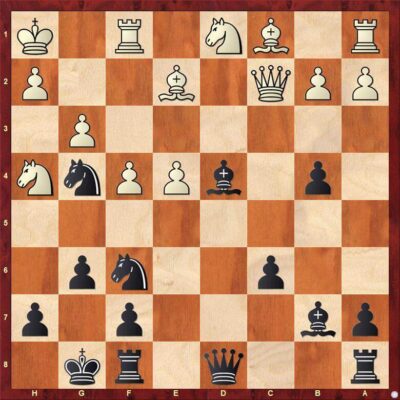
we have a weird position. White’s pieces look poorly coordinated, but if he manages to finish his development issues, the positional advantage – White’s better control in the center – starts to tell. That means that Black’s chances rely mainly on dynamic ideas and active counterplay. As said, the theory is still being developed here, with less than 10 games having reached this position so far. That’s exactly why I think this line has a lot of potentials to become more popular in the next years. I tried to make a small contribution to this discussion in Chapter 11.
At the end of the database, you will find 22 interactive test positions.
About the Author
IM Renato Quintiliano is a Semi-Slav Defence expert himself, has been playing this opening with both colors for years, and achieved multiple notable victories against multiple 2600+ Grandmasters.