

Rook vs. Bishop Endgames: 5 Must-Know Positions
I’d like to devote this article to the Rook versus Bishop endgames. It is a very important endgame and is often misunderstood and misplayed at the club level. This endgame is not as complicated as you may think but requires some knowledge and precision.
Rook versus bishop endgame may not be the most often seen ending, but it appears pretty frequently and there is a good chance you will see it in one of your most important games. Regardless of the side you play, there are two types of positions you must know. The first one is the “typical fortress”, how to set it up and how to defend it.
The second one is the exact opposite: how to attack the fortress, and how to “break-through”, winning the bishop or checkmating the king.
How to defend the “fortress”
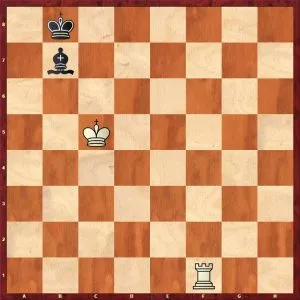
The first and most important rule of defense in this type of positions is relocating the king to the “safe” corner. A safe corner is the one opposite to the color of your bishop.
Black to move
In this position, black needs to get his king to h8 or a1 corner, the bishop stays on h7/g8 or b1/a2, and there is no way for white to break through.
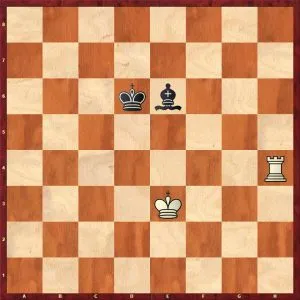
The “wrong corner” scenario
What happens, if the defending side does not reach the correct corner, and ends up in the wrong one?
White wins, because compared to the previous example, Black cannot draw by stalemate: after Kb6 Bc8 Rf8 Black is not stalemated and loses.
Let take a look at a more complex example:
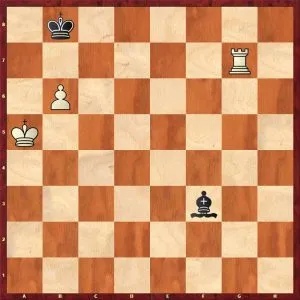
White to move
Before reading on, take your time and try to find the way to win.
Black’s king is in the wrong corner, and white has an extra pawn. It would seem that it is easy to win, however, once we think deeper, it turns out that white’s pawn prevents his own king from getting to b6 and checkmating.
So it is necessary to get rid of it!
White wins by playing b7! It allows him to get the b6 square and decides the issue.
In this example, we learned a very important winning pattern and a defending attempt as well. The stronger side often wins by double attacking the opponent’s bishop and the last rank, while the defender tries hiding his bishop behind the king. It’s an important idea, but in this position white still wins.
“Correct corner” + Pawn on h5
Now, as we have almost become experts in this ending, it is time to move forward and analyze in detail even more complex position.
White has an extra pawn, while Black’s king resides in the correct corner. Before reading on, evaluate the position and try finding the winning plan for white (if you think white wins here) or an equalizing plan for black (if you tend to think that it is a draw).
Why is it so important to think on your own before learning the correct technique?
The reason is simple. When you see the solution with a decent explanation, you just think it is easy and understandable. However, when you try to figure it out on your own and possibly fail to do that, you pay more attention and remember the ideas much better.
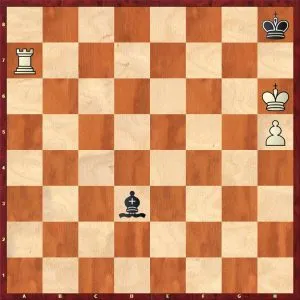
Black to move
Surprisingly, despite the fact that white has an extra pawn, he cannot convert it. As we will see later on, the position is a draw because the pawn is already on h5. If it was on h2, h3 or h4 white could still win.
If there was no pawn, both Bc4 intending Bg8 as well as Kg8, running from the corner, would lead to a draw. However, with the pawn Bc4 loses.
This is why the only way of defending is temporarily leaving the corner, so the correct move is Kg8!
“Correct corner” + Pawn on h4
As you probably already guessed this position is winning, but again, before looking at the solution, try to find it yourself.
What is the difference between pawn on h4 and h5?

White to move
The most important nuance is that white has the h5 square for his king, and after forcing black’s king out of the corner, white can cut him off and not get stuck in the corner.
The takeaway…
To sum up, I am inclined to think that these positions are the most important ones for Rook and Bishop Endgames. If you know and understand them well you will quickly know whether or not you should go into one of those endgames after exchanges, etc.
I believe that it is incredibly important not only to have good skills of playing endgames with advantage, equal or worse ones but also to know the theoretical component, as when you reach these positions while calculating.
You do not have to calculate more; instead, you can just stop and evaluate it according to your knowledge. Even though the endgame theory is enormous and even the best Grandmasters in the world sometimes forget the positions, you only need to know a relatively small number of them to achieve outstanding results in your tournament games.
Hope you have enjoyed the article and it will support your interest in the endings!


Comments: