

Rook Endgames: 4 vs 3 on The Same Flank

Rook endgames are drawn, all of them, they say… but are they really? They might be, but how many times has it happened that you drew a winning one or lost a drawish one? Probably every chess player has such examples, as well as happier situations when the game has changed in their favor. They are definitely some of the most difficult endgames and studying them could save the day more than once.
Rook endgames can be difficult to evaluate sometimes and the advantage of an extra pawn could mean nothing. It all depends on the position on the board, but as a general rule, if the pawns are on the same flank, then drawing chances increase significantly.
Sometimes an extra pawn could give no advantage at all. As in these endgames probably the most important factor is the activity of the rook. This element could completely transform a position with an uneven number of pawns. Most of the time a very active rook can fully compensate for a missing pawn. Forcing your opponent into passivity is what you should always be looking for. And, many are cases when a pawn is even sacrificed in order to achieve counter-play.
Rook Endings – Part 1
In today’s article, we are going to approach a specific situation – the 4 against 3 on the kingside. As mentioned before, the chances of this endgame ending in a draw are very high, but you shouldn’t treat it carelessly, as there are a few things you should be striving for with either dice. That being said, let’s see what you should achieve in order to hold the endgame to a draw:
The pawn structure. It is very important to remember the pawn formations that you should strive for in such endgames: f2 (f7) – g3 (g6) – h4 (h5) or f3 (f6) – g2 (g7) – h4 (h5). In order to win, the stronger side will try to push their g pawn to g4 (g5) in order to weaken his opponent’s structure with the further h5 (h4). The above-mentioned plans stop such ideas, but also enable massive simplifications in case the stronger side tries to advance the pawn. Remember, pawn exchanges usually favor the weaker side.
The position of the king. The king should remain on g2 (g7) or around it in case you defend with g3 (g6) – h4 (h5) or on g3 (g6) if you have the set-up f3 (f6) – g2 (g6) – h4 (h5). Don’t stray too far, as the king is needed in order to defend the kingside.
The rook should be kept on the side, constantly pinning the pawns or attacking the weakness (the backward pawn in the position), thus preventing the pawns from advancing and the king from activating.
Rook Endgames – Part 2
We have considered above the e3-f2-g2-h4 versus f7-g7-h7 type of structure. However, if the weaker side has doubled pawns (on the f file, for example) things are even simpler. In such cases, the draw is easier to achieve, as the attacking side won’t be able to advance the pawns without provoking massive exchanges.
Let’s start with the following example where we will take a look at a first drawing set-up for the weak side, f6-g7-h5:
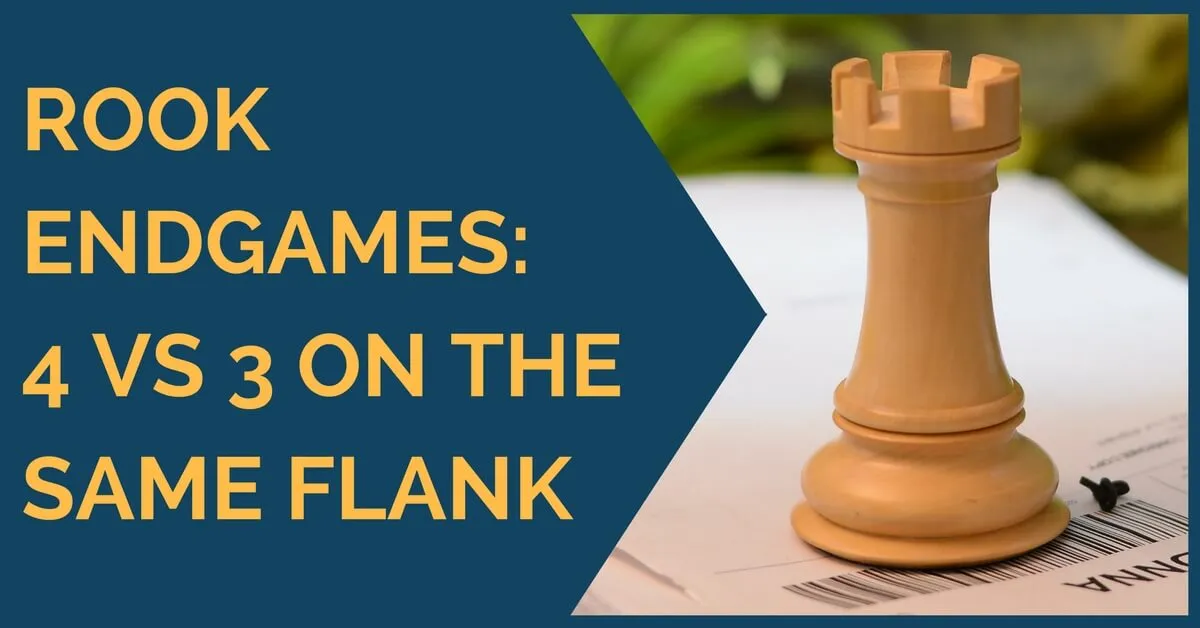
Lilienthal – Benko, Moscow 1949
Black to play
In the diagrammed position black is just in time to reach the desired set-up, so he continues with …h5! He keeps the rook on the side, making it difficult for white to advance his pawns and get a passed pawn in good condition. White kept pressing, but black defended correctly and the game ended in a draw. See the whole game below:
In the next game we will see the other drawing set-up, f7-g6-h5:
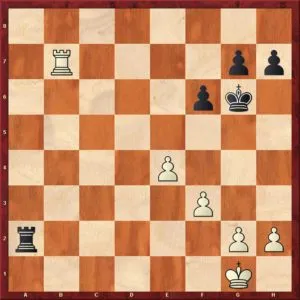
Piket – Kasparov, internet 2000
Black to play
Again, black starts with …h5! reaching soon the already-known set-up. However, black commits some inaccuracies later on and white ended up winning the game. See the game with comments below:
Last, let’s see how the strong side can fight for a win:
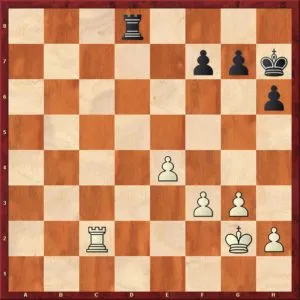
Capablanca – Yates, Hastings 1930
White to play
Knowing now what each side has to do in this type of position, try to find the most accurate move for white in the above position. How would you continue?
Conclusion
As you can see from the examples shown here, the endgame is not easy and it requires attentive play from both sides. However, knowing what you should be looking for with each side, we hope that you will find it easy to play next time it arises in your games. Good luck!
Ready to start winning games? Check out our store and articles:


Comments: