

Rook vs Bishop and Pawns: Surviving Lost Endgames

There are certain things in chess that we only learn through experience at the chessboard, or as they say, “the hard way”. This is the case for typical endgames in which we fall by accident and have to work our own way out to survive. If you are already a skilled player then you should succeed in finding the right moves on the board, although not without difficulty. If you’re a club player then it is almost certain that you will lose these kinds of endgames for not knowing what to do, or more importantly: not knowing exactly what you should NOT do! In this article, we will give you a short explanation of what we think are the most useful things to know about the endgames in which one side is one exchange down and there are pawns on the board on the same side. Let’s start with the next position:
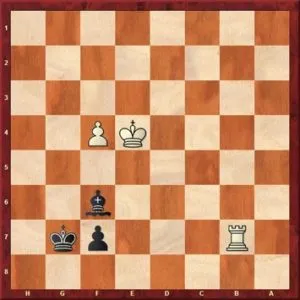
King + Rook & Two Pawns versus King + Bishop & Two Pawns 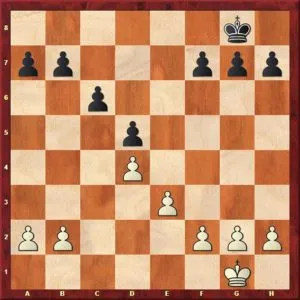
What should we know about this endgame? What is the essential thing to remember?
- The bishop has to stay and guard the square f6, from any square.
- The king stays on g8; it is vital to avoid the entrance of the white king on f7
- The correct configuration of pawns is g6-h5; if this is not achieved then the fortress won’t work
But what if the pawns were on the G file and not on H? Let’s see what would happen in case the pawns were on g5 and g6 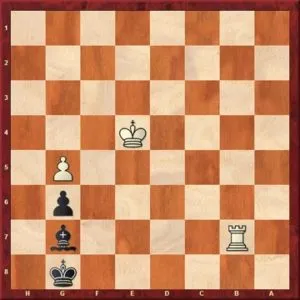 This seems to be another fortress; white can’t win. However, you have to be very careful here. This endgame can arise from our first example (see DIAG 1) after the trade of the H pawn for another white pawn on g4 (hxg4). It is imperative to remember that we should always look at the possible exchange sacrifice in order to reach a winning endgame.
For instance, if it was white’s turn in this position then 1.Rxg7+! produces a simple winning pawn endgame. Beware! If it was black’s move, then 1…Bc3 draws with ease. Just as in our first diagram, the king guards the square f7 and the bishop the square f6. The white king can’t get any closer and the draw is the correct result. Does the same rule apply to the F pawn?
By knowing these three simple rules you should be able to work your way out to a draw if defending or to a win by taking advantage of your opponent’s mistake of not applying what’s stated above. In the diagrammed position it is black’s turn to move so the first thing to do in order to achieve the desired result is 1…h5! We have done some analysis to show you why:
Now let’s take one pawn out and see if the same kind of defense works: 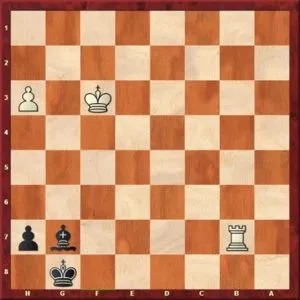 The answer is NO. This endgame is won by white. Nevertheless, it is useful to know what exactly should white try to achieve in order to break black’s defense.
- The goal is to force black to move his pawn to h6. The weakness of the g6 square can be used later on by the white king.
The conclusion is that black can’t hold this position. See our analysis here:
 This endgame should also be a DRAW with correct play. What you need to do with black is to keep an eye on the square g5. Basically, avoid the move f5-f6+ at all cost and white won’t make progress. See our analysis here:
We hope to have taught you something new about these endgames. It is an easy to learn topic and it is always useful to know well your fortresses; you never know when you are going to need it! Thank you for reading and, as always, feel free to share your thoughts!
Ready to start winning games? Check out our store and articles:


Comments: