

4 Things to Know about the Sacrifice on g6/g3


When preparing an attack against the enemy king it is important to know the typical sacrifices and attacking patterns. We have already covered most of the ways to start an attack and the most common tactical ideas in our previous articles and today we will take a look at another potential target of the attack – the g6/g3 square. The main purpose of this sacrifice is the complete demolition of the kingside pawn structure in order to use the newly open files and diagonals to deliver a mate.
Most of the time the sacrifice on g6/g3 is possible thanks to the partial weakening of this square (either the h or the f pawn has left the 7th rank).
There is no clear rule to tell you whether this sacrifice will work or not, you have to always base it on calculation. However, there are a few elements that usually lead to successful combinations:
- Piece cooperation. A sacrifice is more likely to succeed if your pieces are placed on ideal squares from where they can quickly join the attack. Just think about a central knight or a rook placed on an open file from where it can easily be transferred to the kingside via the 3rd (6th) rank. A quite common idea in most attacking games.
- Defenders are outnumbered by attackers. If most of your pieces are pointing at the enemy king, this is usually a good sign that your attack will succeed. If your opponent has a piece that seems to be doing a great job in defending the king, a common idea is to exchange it or force it to go on a more passive square before executing the sacrifice.
- Weaknesses in the kingside pawn structure. An attack usually starts with small threats against the king that will force our opponent to make weakening pawn moves. Creating these “holes” in the enemy position will make it easier to find tactical ideas that will allow your pieces to break through.
- Lead in development. Even a slight lead in development can represent a great advantage and a sign that you should immediately start the attack. In any case, remember that this advantage can be lost easily if you’re not acting quickly enough. So, in order to keep your opponent in an uncomfortable position, always look for active moves (moves that threaten something and force him to make certain defending moves instead of finishing his development)!
Let’s take a look now at some examples where grandmasters have employed this finishing blow in their games:
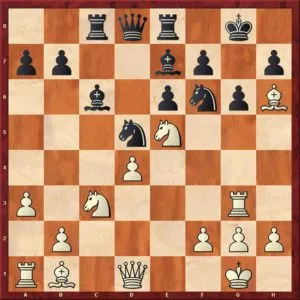
Yemelin, V – Navara, D, Czechia 2010
In the diagrammed position we can notice that most of the points mentioned above are present. Almost every white piece is pointing at the black king. White has harmoniously developed his pieces and brought them on active squares. Nevertheless, the g6 square seems to be well-guarded at the moment. However, this is just an illusion and black is not able to bring his pieces in time to defend against white’s attack. See how the game continued here:
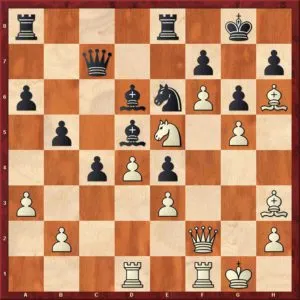
Swiercz, D – Socko, M, St Petersburg 2012
Here, the possibility of a sacrifice on g6 may not seem so obvious. However, the idea becomes clear once we spot the mating threats that will appear once the h file is open. Black still has a defensive idea, but it is not enough in order to save the game. See how white finished the attack below:
So far we have seen examples where white sacrifices a piece for the g6 pawn, but this is not always the case. Let’s take a look at the following diagram, where white uses the weakness of the g6 square in order to destroy black’s defense:

Berg, E – Bareev, E, Gothenburg 2005
Here, white played Bg6!?, an interesting idea meant to open the black king. The resulting position is not winning, as black could have saved the game, but the idea is nevertheless one to keep in mind.
We hope that you have found the examples and ideas presented in this article useful and that you will be able to apply them in your future games. Thank you for reading!


Comments: