

The King Walk – Must Know Middlegame Patterns
Today, I have decided to come up with a few examples on the topic that are very challenging for any chess player – even of the highest level. This is primarily because it’s totally counterintuitive, namely using your king in the middlegame while the battle is in full swing.
It’s difficult because the first thing we learn about chess is that the king should be kept safe. Then, as we mature and improve our game, we learn that, in the endgame, the role of the king increases: it can be an active piece, even one of the most active. So, how to use the king in the middlegame?
Let’s start with the most spectacular example—a true masterpiece—that will remain among the greatest chess treasures forever.
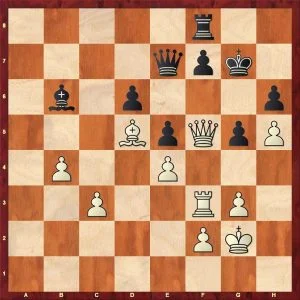
Example 1: Short – Timman, 1991
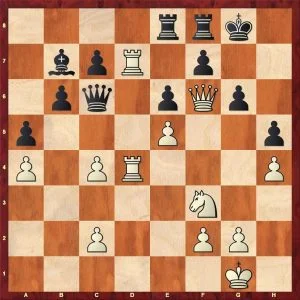
White to move
By looking at this position, we notice that White definitely exerts significant pressure. He controls most of the board and the dark squares in Black’s camp are weakened, with White seizing the only open file in the position.
So, how can we finish the game from this position?
The first thing some people would look at is how to execute the g2-g4 break at some point, trying to open the Black king.
However, this is incredibly difficult to achieve, as the White rook on d7 will hang and, to make matters worse, the crucial diagonal h1-a8 will become tremendously weakened. Furthermore, the Black bishop on b7, which wasn’t effective earlier in the game, will become a very strong piece.
So, take your time and try to come up with the solution.
1…Kh2!
What is this?
Maybe just a semi-waiting move?
Maybe White wants to see what his opponent will do?
1…Rc8 2…Kg3!! No, White’s intentions are totally different! 2..Rce8 3.Kf4!! Bc8 4.Kg5!
Since there’s no defense from Kh6, Black had no choice but to resign.
The next example is one of my favorites regarding another interesting and different position: the advantage of two bishops. At the same time, it suits our purposes perfectly as well.
Example 2: The Bishop Pair

It seems as though it will be a rather typical ending with White having the bishop pair [how to fight the bishop pair, in case you curious], Black keeping a solid position. It’s natural to return Kc2, then play around, waiting for the opponent’s mistake.
However, Sveshnikov chooses a different path. As my regular readers know by heart, before taking a look at how the game continued, you’re welcome to ponder the position.
1. Kb4!! I use the rare two exclamation marks to award, not the move itself, but the idea behind it.
1…Ne4 2.Ka5! Nd6 3.Kb6! Rc6+ 4.Ka7!
I think the resulting position deserves another diagram. White basically has an extra king in the game and he won convincingly, as you can see:
One more example—and a more complicated one—demonstrates the same ideas vividly: sometimes we can just get an extra piece if we dare to get our king out!
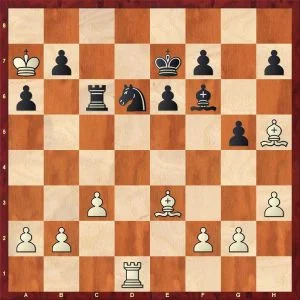
I attach one more game in the viewer but wouldn’t usually start with the initial position. After some maneuvering, the situation on the following diagram appeared:
White to move
White has an extra pawn and the light squares in Black’s camp have been weakened significantly. But how can White improve his position even more?
Moving the pawns isn’t possible yet, as they’ll just get blocked.
1.Kf1! Ba7 2.Ke2 Bb6 3.Kd3 Ba7 4.Kc4! Qc7 5.Kb3 Qe7 6.g4 Bb6 7.Kc4 Ba7
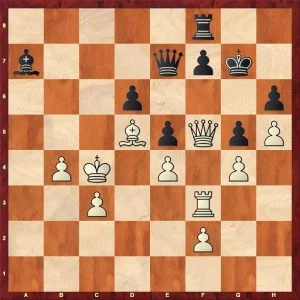
White brought his king into the heart of the battle!
It’s White to move again, so how can you achieve further progress?
I hope by this point, it’ll be no surprise for you that White played…
8.Kb5!!
White’s plan is to trade queens and get a winning endgame, which is exactly what happened in the game, as you can see in the viewer.
In my opinion, this pattern, one that is already standard for the best players in the world, is one that can help you achieve much better results, as mastering it basically helps you see the board from a totally different perspective!
Also, it helps us develop the ability to think without banalities—in a creative way—that will help not only in chess but also outside our wonderful game.
I hope that you have enjoyed the examples and learned a lot and that you’ll get a chance to apply this knowledge in your own games!


Comments: