

Playing Against the Opponent’s Bishop


Having active, well-coordinated pieces is all a chess player can dream about. It is one of the most important principles that you have to keep in mind during the game. Always improve your pieces and look for the most active squares they can occupy. Treat your pieces well and they will help you deliver the blow in the decisive moments. You will see how everything connects and every piece will have its specific and important role.
As important as improving your own pieces is, you cannot forget about your opponent, who will most likely try to do the same. An important strategy to apply in this sense is to play against his/her plans and try to keep his/her pieces as passive as possible.
There are specific ways to do this, correlated with the position on the board, but we are going to dedicate this article to show you how you can play against the opponent’s bishops. There are many ways to try to bury this piece and end up with more active forces and one that is particularly interesting and effective is a plan that became famous after the former World Champion Jose Raul Capablanca successfully used it to win his game against William Winter in Hastings 1918.
It basically involves driving the rival bishop on g6 (g3) and burying it on this square with the help of the pawn formation e4 (e5) – g4 (g5) – h3 (h6).
Let’s see how this translates in practice and we will start with the above-mentioned game:

William Winter – Jose Raul Capablanca, Hastings 1918
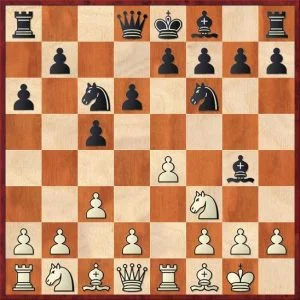
Black to play
The plan black used in this position may look bold and slightly weakening, but there is actually nothing to fear and a short calculation will show that no tricks are possible from white. Black continued here with 10…g5! forcing the white bishop to g3. It is important to note that sacrificing on g5 is not an option for white in view of 11.Nxg5 – Nxd5! and he will lose a piece without any compensation.
The point of black’s move is seen after 11. Nxf6 – Qxf6 12. Bg3. Now the idea is to leave white with the bad dark-squared bishop, which will find it hard to leave its prison – 12…Bg4! After the trades on f3, it becomes clear that white will not be able to activate his bishop without losing any material and unless he does so, black will be playing with a piece up for the rest of the game.
It’s true, black’s bishop may also look like a bad bishop, as it is limited by its own pawns, but this will not be forever. Black’s plan is to play on the queenside, where the white bishop cannot help and his own bishop will eventually come to life. See how Capablanca converted his advantage in the game below:
Insert Winter-Capablanca.pgn
If in Capablanca’s game the doubled pawns on the f file made it very difficult for his opponent to activate his bishop, it is important to know that you can use the same plan even without managing to double your opponent’s pawns.
The following game is an instructive example of this:
Michael Adams – Kacper Piorun, Germany 2013
White to play
You already know the pattern – white continued with 8.h3 and after 8…Bh5 with 9.g4, forcing black’s light-squared bishop on g6, where he keeps it locked for the rest of the game.
Later on, we can see the same idea as in Capablanca’s game [his 15 best games are here] – white plays Bg5 and Bxf6, only this time the point is not to ruin black’s structure, but to leave him with the bad pieces and keep him from ever getting to play …f6 and activate the bishop.
In the meantime, the pressure white put on the center and queenside was too much to handle for black, who was playing with a piece down on this side of the board. See how Adams outplayed his opponent below:
Insert Adams-Piorun.pgn
We hope that you’ve found the plan presented in this article instructive and you will be able to use it successfully in your future games.
Thank you for reading!


Comments: