

Sacrificing the Exchange: Part II

Some time ago, we wrote about the common resource of sacrificing the exchange in order to change the character of the position drastically. These changes could be taking over the initiative, breaking your opponent’s defenses or they could just be positional sacrifices, for example sacrificing the exchange in order to obtain a superior pawn structure, or obtaining a strong outpost for a minor piece in the center.
We’d like to call this a ”resource” because it’s something that you can’t plan from the start (there are exceptions of course), but the idea can occur to you during the game in order to achieve goals. In my last tournament that ended just few days ago, I sacrificed the exchange in three games, two of them were correct and the other was simply wrong. In my chess career I have employed this resource several times, and with success.
As we mentioned in our first article on this subject, one of the key things is to evaluate the position accurately. Sometimes you’re in a worse position, and after sacrificing the exchange you’re still worse but matters are less clear. Other times, the exchange sacrifice is just the path to a better or even winning position.
Make sure you evaluate correctly. In this article we are going to discuss when to execute an exchange sacrifice. To give the reader a clear idea of the thought behind the exchange sacrifice, I have chosen examples of my own and I will explain what led me to sacrifice material.
Tip:
In order to fight blunders, find the right plan in complex positions and improve your positional and tactical vision we recommend you to sign up for our comprehensive training course. Hundreds of chess players already benefited from our training . Don’t wait, start winning chess games today.
I’ll take the positions beginning exactly where the idea of sacrificing the exchange occurred to me.
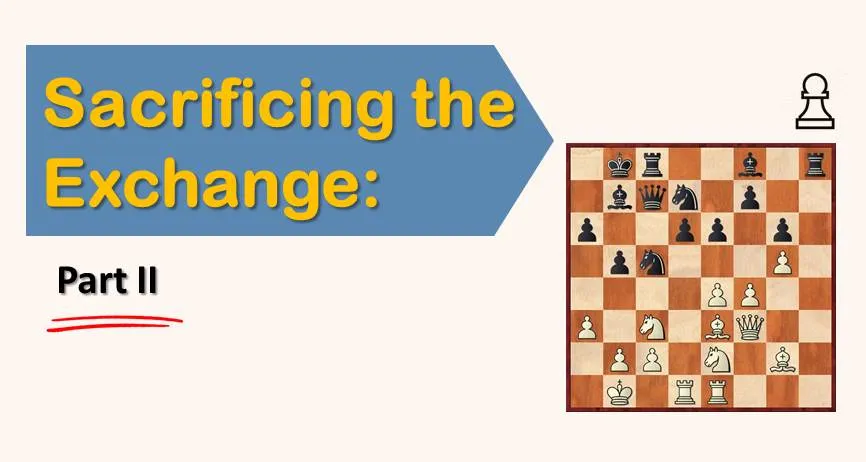
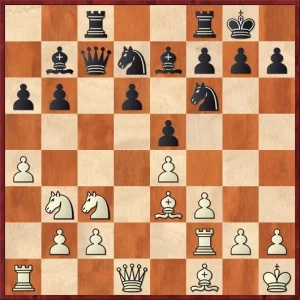
Example 1: When NOT to do it
Here I’m playing with the black pieces. After realizing that my opponent (rated 200 points lower than me) had just equalized because after moving my rook he will take on b7 followed by d5 with a massive simplification, I started to dream of a light square domination and played 18…Rad8?
This is a clear case of OVERSTIMATION of your chances. This wrong sacrifice could have cost me the game.
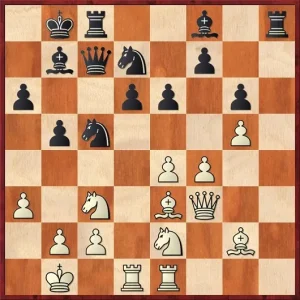
Example 2: Your path to victory
Black’s advantage is undisputable: strong outpost on e5, full control of the dark squares, and white has many weaknesses – b3, h3, e4. However, it’s time to materialize the positional superiority, but how?
The move Rc-h8 simply went into my candidate moves, and then I realized that after taking on h3 my rook on the 6th rank would be very active and white’s position was going to start collapsing without the bishop on g2. Basically he won’t be able to defend his weak pawns.
Example 3: Positional compensation
I had just played 20.h5 in the diagram above. Of course, I realized that black has 20…Nxd2 21.Bxd2 Be2 but here is the thing: I could not wait to play h5, I have a very weak pawn on c3 and slow play is not advisable here. I saw that after 21…Be2
I can simply offer my exchange by capturing on g6 and if my opponent captures on g6 (hxg or fxg) I will move my rook to e3 with tempo. Now the key here is to understand that after 22.hxg6 Bxf3 23.gxh7+ Kh8 24.Bxf3 white’s compensation is enough to play for the win.
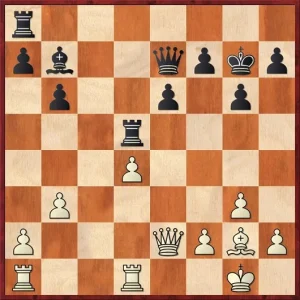
Example 4: When being under positional pressure
This was a game against the strong GM Alexander Delchev, who is also an author of many books. Here white has a very annoying pressure over black’s position. He is going to play Rd2-Nc1-a2-b4 and take control over the key square d5. I started to look for ways to counter attack this plan.
I had no possible pawn ruptures, neither targets to attack and it became clear that I had fallen into a passive position. The threat of Nc1-a2-b4 and eventually any knight to d5 was worrying me the most, then the following idea occurred to me: Rc7-Rfc8 and Rxc3. I would have a pawn for the exchange and I would have eliminated my opponent’s positional pressure, at least a little.
The assessment of the position resulting after Rxc3 is still better for white, but things aren’t so simple anymore and I managed to draw the game.
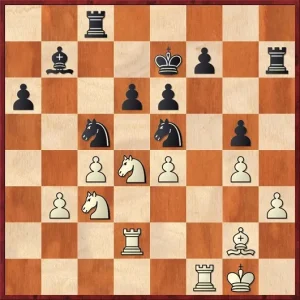
Example 5: Changing the character of the play
Black is fine in the diagram above. The king is safe, everything looks solid enough but there is a lack of active plan to breakthrough white’s centralized forces. Probably black can consider moves like 19…Bg7 or 19…f5 with a level game. However, I saw a much more attractive idea, the provocative 19…Rh2!?
Tempting my opponent to play 20.Qg3 winning a “free tempo”, but my rook is not meant to return. The idea was to eliminate the bishop on g2, take a pawn on e4, and keep on going as if nothing has happened. The character of play changes, black is no longer under pressure, white’s idea of playing f4-f5 is never again available, and moreover he will be on the defensive side, so the sacrifice seems justified.
We hope that, with the examples mentioned above, the reader will enjoy and improve his understanding of the exchange sacrifice resource and keep it in mind for his future games. Good luck!
here are other setups that white can try but they are not principled and they shouldn’t be too dangerous for black. We hope now you have new weapon against the Morra Gambit and the analysis and games provided above serve you as a guide to start your own research on this line.
If you want to improve your chess level, you need to have a clear study plan. If you aim for a dramatic improvement at chess you need to work on all of the elements of the game in a systematic way:
- tactics
- positional play
- attacking skills
- endgame technique
- classical games analysis
- psychological preparation
- and much more
That seems to be like a lot of things, and that is. But no worries, we have made it easy for you. Our comprehensive training course covers it all and much more. Sign up for 21 Day Training right now!


Comments: