

Chess Fortress – 7 Must-Know Positions

Chess Fortress: What is it, how to build one, and how can this knowledge help from the practical point of view? I would like to investigate a topic, that I find extremely important, yet it feels like it’s ignored and misunderstood by most club chess players.
First, let’s define, that a fortress is a position with the defending side down in material, yet impossible for the stronger side to make any decisive progress.
This topic is difficult for many players because it contradicts one of the main chess principles: the material is the most crucial factor, and you don’t want to give up your material.
As we will see in the following examples, sacrificing material in order to build the fortress often proves to be the only way of saving the game.
Let’s begin with the simplest example.
Chess Fortress #1 – Wrong Color Bishop
Of course, this position is well-known to any chess amateur, being one of the most basic ones. White cannot make any progress, as the bishop doesn’t control the square. Black just stays in the corner for a draw.
But here comes the crucial question – How can you benefit from the basic knowledge in the more complicated positions?
Let’s consider another example.
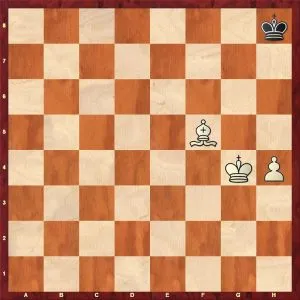
#2 – Wrong Color Bishop 2.0
White to move.
Of course, from first sight, the position seems totally lost for white. Black will advance his pawns and slowly dominate. Is there a way to save the game?
Please take a minute to think it through.
White cannot make a draw by playing on “regularly”, so he needs to act immediately:
1.Rh8+! Rc8 2.Rc8 Kc8 3.Ba6!!
Black is forced to take and he gets two corner pawns and the wrong color bishop. Or if black doesn’t take, White takes the pawn on b7 and we reach the same endgame.
Would you be able to solve this kind of position under tournament conditions?
Oftentimes, you play endgames in time trouble, and hardly have any time to think. If you weren’t familiar with the first position, it would take you much longer to find a solution. First, you would have to:
- Notice the possibility
- Play it out in your head to make sure it’s not lost
- Play it out on the board
Hardly possible with seconds on your clock, is it?
By looking at this simple example, we can understand why it’s so useful to know the basic ideas behind a fortress.
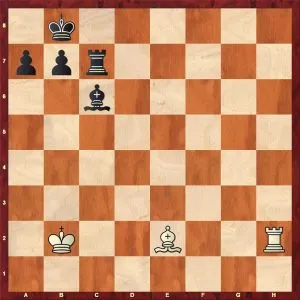
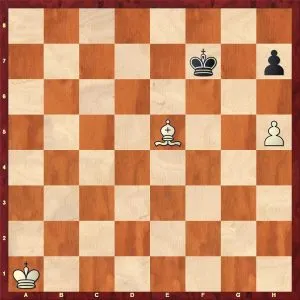
Chess Fortress #3 – the Pawn on h6
Here we see one more interesting position. How would you evaluate this situation?
Yes, that’s right, the bishop is of the “right” color and it controls the h8-square. But since the pawn is already on h6, White cannot achieve anything but a stalemate, as he’s incapable of forcing the opponent’s king out of the corner.
If White had the pawn on h5, he would have been able to play Kh6, forcing the black’s king out of the corner and winning the game in style!
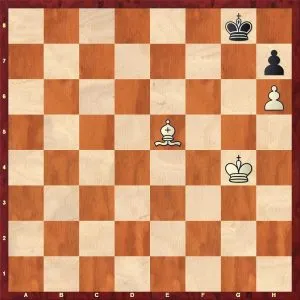
#4 – the Pawn on h5
Now once again I’ll try to show you, how you can apply the acquired knowledge in practice:
White to move
The pawn is on h5, which means that if White had time to bring his king over, he would win. But Black can benefit from a few tempi he possesses to hold this position. See the solution below:
Chess Fortress #5 – Stalemate
To make sure your experience with the bishop endgames is complete, I found one more example, that is less likely to be encountered, still, it is important to better understand fortresses.
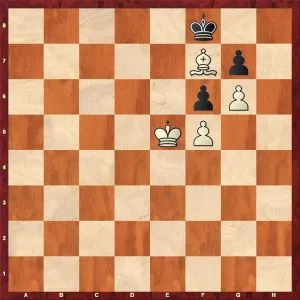
Once again White is unable to make any progress because of the stalemate threat. Interestingly, if we added more pawns to this chain (White pawn on e4, the Black pawn on e5; the White pawn on d3, the Black pawn on d4) it wouldn’t change the evaluation: the position we see is a fortress!
Now, as you have understood and remembered my previous examples, you definitely know more about fortresses than the majority of your opponents.
It will pay off shortly. You will save more games, and draw instead of losing interior positions. This will help you to add up those Elo points or perhaps even collect a few more trophies!
To give you a complete picture, let’s take a look at a few more positions of a bit different sorts of fortresses.
#6 – Tempo Wins the Game
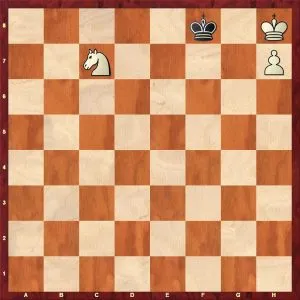
Black to move
In this position, everything depends on the side to move. The key point for understanding this position is the following: the White’s king is in the cage, and black has to keep him locked up by positioning the king either on f7 or f8.
The white knight is incapable of winning or losing a tempo, so the game cannot be won by the zugzwang.
If it is White to move, white can play Ne6+, then after Kf7 he controls the square f8, so if Black were to move now, he would lose. Unfortunately, the knight has to move again, thus making it possible for Black to return with his king.
If it was Black to move, he would play Kf7, and after Ne6! he doesn’t control the square on f8, so he has to retreat or take the knight, letting the White king out of the corner and White wins easily.
Chess Fortress #7 – Tempo Wins the Game
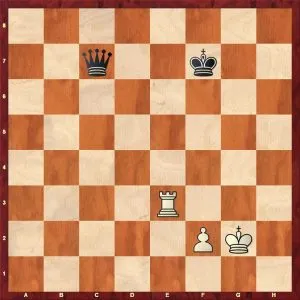
Let’s take a look at the last example.
White manages to make a draw, because his pawn is on the second rank, and he has two squares the rook can circulate between e3 and g3. That means Black cannot put his opponent in zugzwang or win the rook by a series of checks. He cannot bring his king closer either.
Looking for more on Fortresses? Look at Everything you need to know.
We also recommend reviewing the 7 Most Important Opening Principles and The Opening Principles According to Dr. Tarrasch.
It’s important to know that the positions with the outside pawns (on a2 and h2) are lost, since the rook has only one square, and ultimately White runs out of moves.
Ready to start winning games with Chess Fortress? Check out our store and articles:


Comments: