

Plans in the Maroczy Bind for White


Maroczy Bind is one of the structures every chess player must study and know how to play with both colors. It is a very popular system that players use against the Sicilian. But, it can arise from various move orders, whether you start by 1.e4, 1.c4, 1.Nf3, or even 1.d4.
You can easily recognize it from the presence of two white pawns on c4 and e4 and the trade of black’s c for white’s d-pawn. With this, white is basically trying to control black’s most typical active pawn break, d6-d5.
Nevertheless, black has other plans to play for and we have discussed them in detail in our previous articles. White is usually playing in the center and on the queenside and is trying to grab more space little by little and keep his opponent as passive as possible. Sometimes kingside attacks can be possible; however, “extreme” expansions should be avoided, as they could provoke unnecessary weaknesses that black can exploit and use in their favor.
Maroczy Bind – Part 1
Probably one of the most common plans seen in practice is the queenside pawn storm, where white places a knight on d5, black trades it, and after exd5 plans involving a3-b4 and a timely c4-c5 become possible and many times quite dangerous. Another interesting idea and one that we are going to address in this article is to capture with the c-pawn after the knights trade on d5. In this case, the fight is for the weak c6 square, which can become a nuisance for black in many games.
White’s idea is to bring the f3 knight to d4 and be ready to jump to c6 when the moment is right. If possible, he would like to reinforce it by means of b4 and b5. White must be careful with this advance, though, as it leaves important weak squares available for the black pieces and if black is the first to take advantage of them and white is not in time to achieve his plan, then tables can turn drastically.
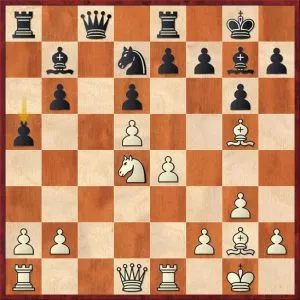
Mrva, M – Schmidt, G, Austria 2006
White to play
This is a typical position that can arise after the trades on d5. White is playing for the control over the c file and for the idea of installing a powerful knight on c6. There is also the weakness of the b6 pawn which black has to keep an eye on throughout the game. Black has just played a6-a5 here with the idea of activating his d7 knight to c5.
Part 2
Knowing this, white’s next move makes a lot of sense – 16. Bh3, improving the bishop, temporarily stopping black’s idea and at the same time creating a powerful threat – 17. Nb5 followed by Rc1. Black soon went wrong and unnecessarily weakened his kingside with h6 and g5, which allowed white to install the knight to f5 instead and get a decisive advantage.
The following position appeared in one of my games in a rapid tournament that I played recently:
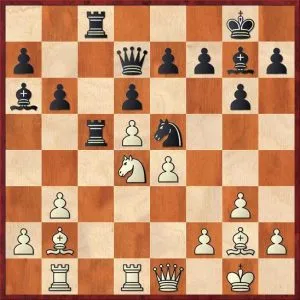
Sgircea, R – Avramescu, M, Bucharest 2019
White to play
It looks like black placed their pieces well. And, the c6 square is just a beautiful dream for the knight on d4. However, tactics work in white’s favor. And, here I went for a nice trick that I had been planning for a few moves already.
Can you find it?
The game continued with 20.b4! The point is that 21.b5 cannot be stopped in view of 21…Bxb5 22.Nxb5-Qxb5 23.Bxe5, winning a piece. Once the pawn reaches b5 and the knight is installed on c6, the white’s position is clearly superior, and the black collapsed quickly after this.
This is a typical plan that can be used whenever the c6 square gets weakened. It doesn’t mean that it will always work, as with correct play black should be able to stop it, but it is an important idea to keep in mind.
Looking for more on Maroczy Bind? Look at this marvelous article about it.
We also recommend reviewing Chess Openings — Top 10 Played by Garry Kasparov and Opposite Color Bishops.
Thank you for reading!


Comments: