

Typical Ideas in the Tarrasch: the c5-c4 Advance

Tarrasch Defense is one of the most ambitious replies to white’s 1.d4 and usually arises after the moves 1.d4-d5 2.c4-e6 3.Nc3-c5, although the same set-up can be ultimately achieved from other move orders.
Black is fighting for the initiative right from the start by occupying the center, gaining space, and harmoniously developing his pieces. It often results in positions with an isolated pawn, but its inventor, Dr. Siegbert Tarrasch, believed that the mobility black obtains in this opening is more than enough to compensate for it and achieve favorable positions.
Getting into positions with an isolated pawn is completely up to white and if he decides to postpone the capture on c5 black can play for different ideas.
Tarrasch Defense – Part 1
One is, of course, to keep the central tension and centralize his pieces, but he can also play for a queenside expansion after the c5-c4 advance. The usual plans include following up with b5-b4 and eventually leaving white in an uncomfortable, cramped position. If black also has good control over the center, he can sometimes pair these standard ideas with threats against the white king, as Dr. Tarrasch himself demonstrates in the following game:
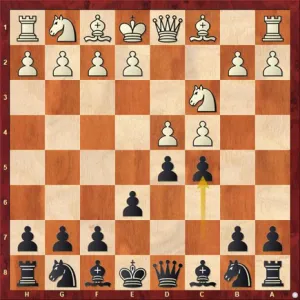
Oppenheim, A – Tarrasch, S, Koln 1908
In the diagrammed position black decided to continue with 9…c4 before developing the dark-squared bishop, hence avoiding the loss of a tempo in case white decided to take on c5 himself. After this advance, white should try to avoid falling into a passive position, with little to no chances of counter-play. In order to do that he needed to try and open the position with a timely e3-e4 pawn break. In the game he retreated the bishop to e2, counting on the b2-b3 break, but, as the game shows, this is not enough to achieve activity for his pieces.
Black is in time to defend his c-pawn with b7-b5 and then get a good grip on all the central light squares. The c4 pawn is like a thorn in white’s position and black went on to use it as an outpost for his knight, which maneuvered to d3, forcing white to give up his light-squared bishop. Left with a bad dark-squared bishop and a weakened kingside, white couldn’t hold on much longer.
Part 2
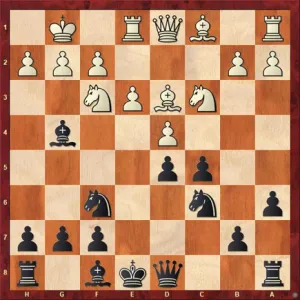
See how Dr. Tarrasch combined the threats on both wings here:
The following game is also a good example of how bad things can go for white after falling into a passive position:
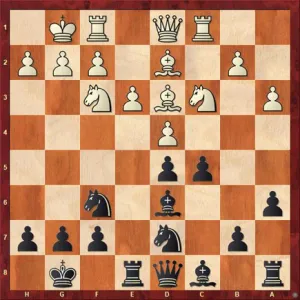
Avalos, N – Kiriakov, P, San Salvador, 2003
White’s last move, 11.Rc1 was an automatic developing move. However, as we have seen in the previous example, it is important for white to bring as many forces as possible towards the center, in order to make a future e3-e4 break possible. It was necessary to develop first the f1 rook and place it to e1, thus preparing the central break. After the game move, black can continue with 11…c4 again and he will be in time to play 12…b5 followed by 13…Bb7 and have white’s center completely under control. With no ruptures left and very little space, white’s position became very uncomfortable. Black went on to place a knight on e4 and start a decisive attack on the kingside.
Looking for more on Tarrasch Defense? Here is This Opening with GM Marian Petrov [TCW Academy] and the 7 Best Games Played by Dr. Siegbert.
We also recommend reviewing the 27 Most Powerful Quotes and Phrases That Describe Chess.
As it often happens in positions where no counter-play is possible, black’s play seemed to just flow. And, the moves came all-natural, while white was struggling for space. See how black successfully conducted his attack:
Tarrasch Defense – Conclusion
The Tarrasch can be a dangerous weapon, especially if white is not familiar with the typical patterns and attacking plans. White should try to avoid these uncomfortable positions and capture early on c5, entering positions with an isolated pawn.


Comments: